As the best-selling video game to date, Minecraft is still very popular in 2021. But many players keep reporting a stuttering issue, which badly affects their gaming experience. If you’re one of them, don’t worry. In this post, we will show you 8 useful solutions.
Before you start
Please install the latest game patch and ensure your operating system is up to date whenever playing Minecraft on your PC. Besides, you should check Minecraft’s minimum requirements and see if your device is powerful enough to run on the game. If it doesn’t, there is no surprise the stuttering happens.
| Operating System | Windows 7 / 8 / 10 |
| CPU | Intel Core i3-3210 or AMD A8-7600 APU |
| GPU | Intel HD Graphics 4000 or AMD Radeon R5 |
| Memory | 4 GB RAM |
After confirming your PC is good enough for Minecraft, then go ahead with the fixes below.
Try these fixes
You may not need to try them all; simply work your way down the list until you find the one that works.
- Make sure Minecraft is using the dedicated GPU
- Update your graphics driver
- Lower your Render Distance
- Enable VSync
- Turn off threaded optimization
- Allocate more RAM
- Uninstall Optifine
- Reinstall Minecraft
Fix 1: Make sure Minecraft is using the dedicated GPU
Sometimes the operating system won’t recognize Minecraft as a game and won’t run it with the dedicated GPU for high performance. If that’s the case for you, you’re likely to experience stuttering in Minecraft. To fix it, you can force the game to use the dedicated GPU via Graphics settings. Here’s how:
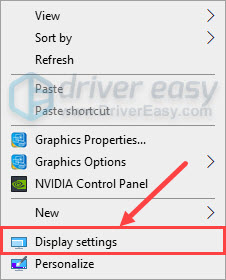
- Right-click your desktop and select Display settings from the menu.
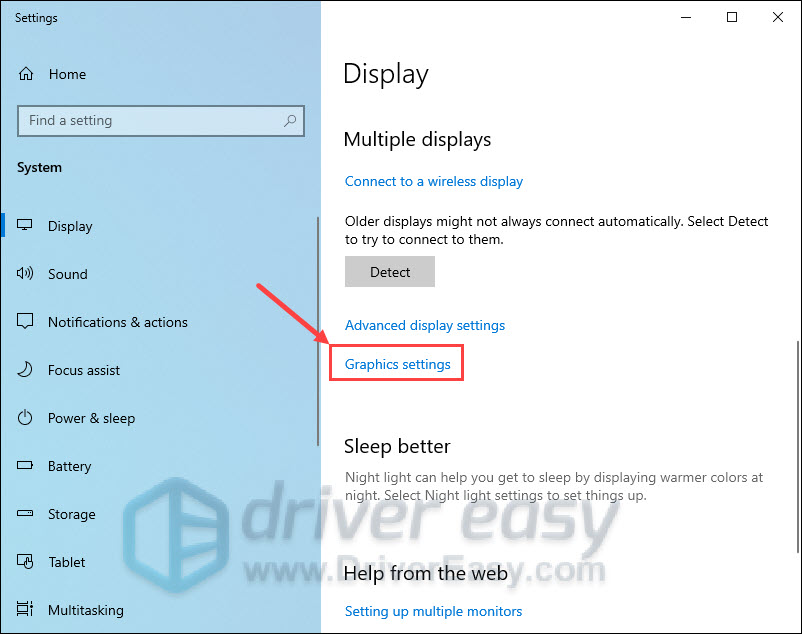
- In Display settings, scroll down the page and select Graphics settings.
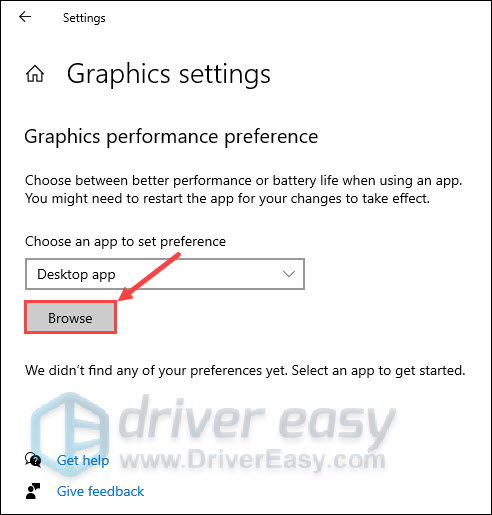
- Click Browse to add the executable file of Minecraft.
- Then click Options.

- In the pop-up window, select High performance and click Save.
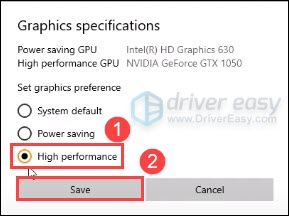
Once done, run Minecraft again and see if the stuttering issue still appears.
If this solution doesn’t help, continue with the next fix below.
Fix 2: Update your graphics driver
Minecraft is a graphics-intensive game, so your graphics card is essential for its performance. You cannot have an outdated or faulty driver on your graphics card since this is usually what causes stuttering in Minecraft. To update your graphics driver, there are two ways you can try: manually and automatically.
Option 1: Update your graphics driver manually
You can update your graphics drivers manually by going to the manufacturer’s website (NVIDIA, AMD, Intel) for your graphics card, and searching for the most recent correct driver. Be sure to choose only drivers that are compatible with your Windows version.
Option 2: Update your graphics driver automatically (recommended)
If you don’t have the time, patience or computer skills to update your graphics driver manually, you can do it automatically with Driver Easy. Driver Easy will automatically recognize your system and find the correct drivers for your exact graphics, and your Windows version, and it will download and install them correctly.
- Download and install Driver Easy.
- Run Driver Easy and click the Scan Now button. Driver Easy will then scan your computer and detect any problem drivers.

- Click Update All to automatically download and install the correct version of all the drivers that are missing or out of date on your system. (This requires the Pro version — you’ll be prompted to upgrade when you click Update All.)
Or you can click Update next to the flagged device driver to do it for free, but it’s partly manual.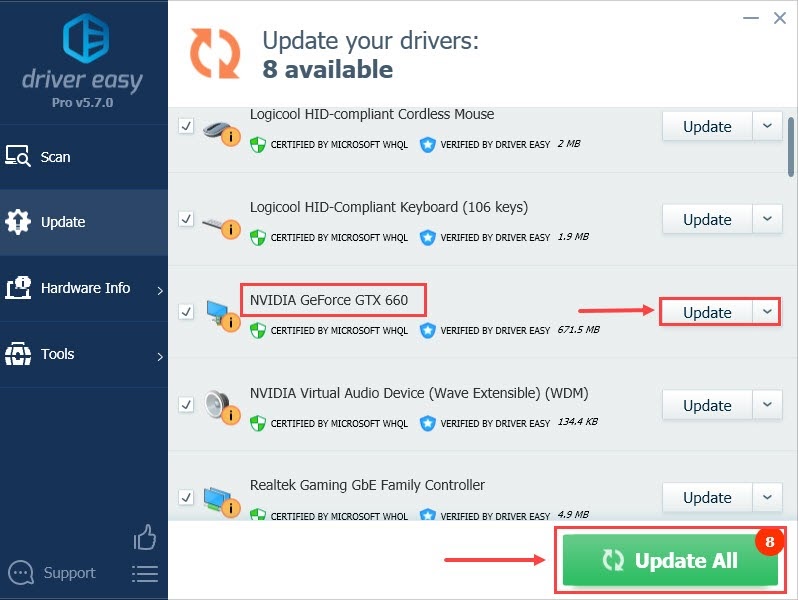
After updating your graphics driver, restart your computer and check if Minecraft stutters again.
If the stuttering issue persists, move on to the next fix.
Fix 3: Lower your Render Distance
In Minecraft, chunks make up your world. And the render distance controls how many chunks of the world are visible at once. So if you set a high value of chunks, you may face the issue of fps drops or stuttering. To get better performance, you should lower the value to 8 or less, depending on your PC’s hardware. Here’s how:
- Run Minecraft on your computer.
- Click Options.

- Click Video Settings.
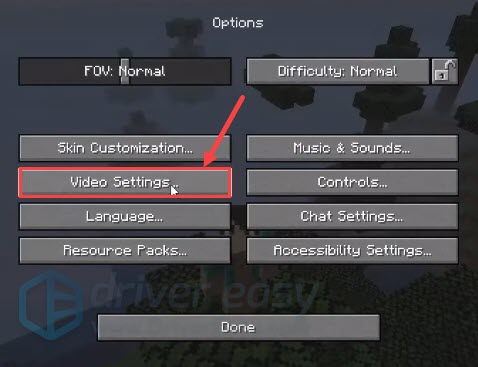
- Lower the Render distance according to your need.
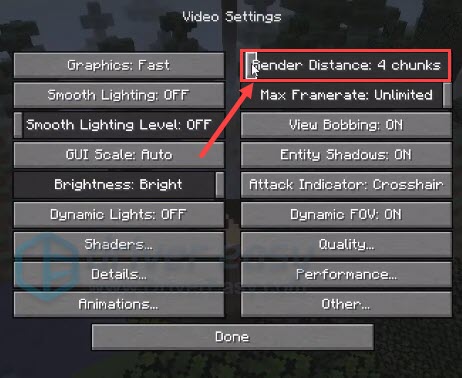
This should give you a better game experience.
But if it doesn’t, take a look at the next fix.
Fix 4: Enable VSync
Sometimes the stuttering issue might occur due to a frame rate discrepancy between the monitor and GPU. But luckily you can fix it by enabling VSync in your graphics control panel.
Via NVIDIA Control Panel:
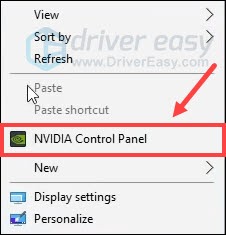
- Right-click your desktop and select NVIDIA Control Panel.
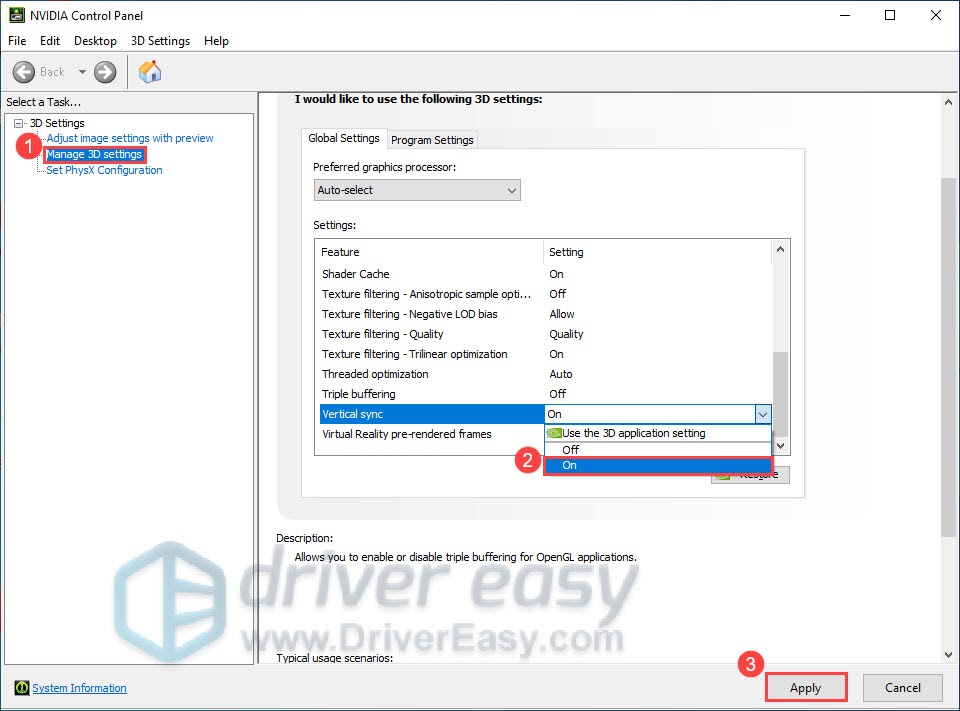
- In the left panel, select Manage 3D Settings, then click the dropdown menu next to Vertical sync and select On. Click Apply to save changes.
Via AMD Radeon Settings:
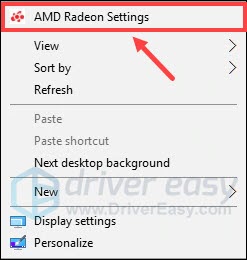
- Right-click your desktop and select AMD Radeon Settings.
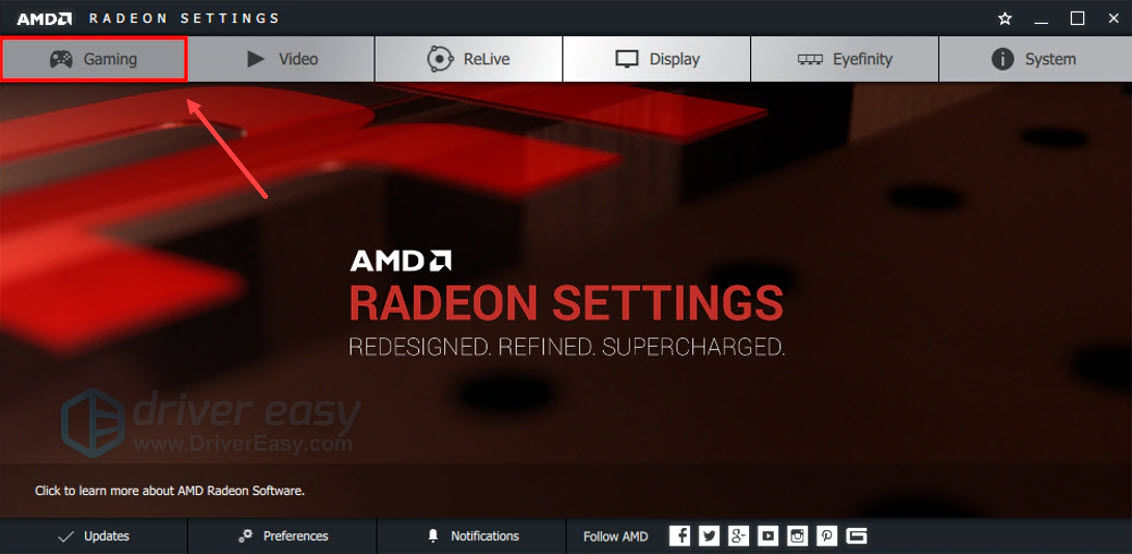
- Click the Gaming Tab.
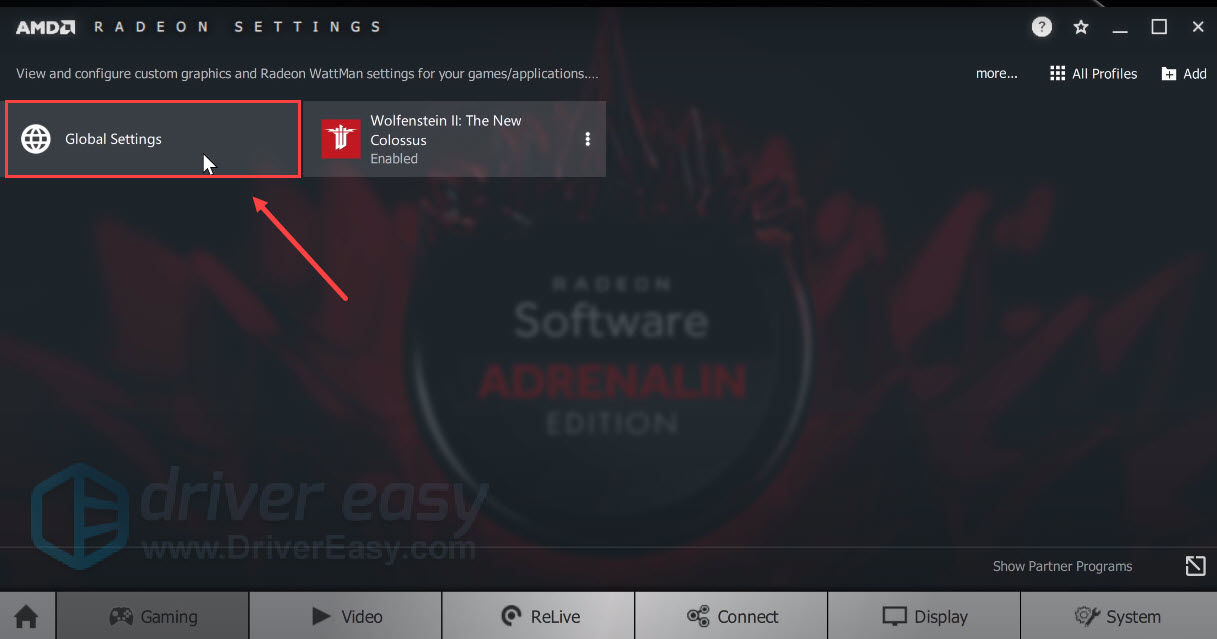
- Then click Global Settings.
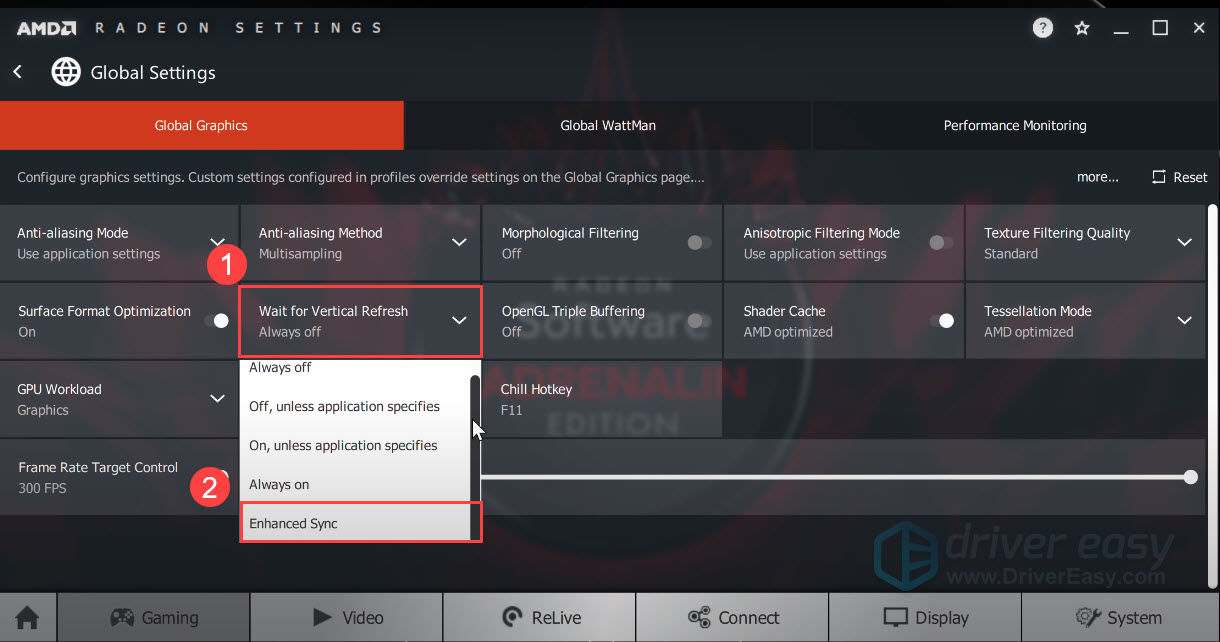
- Click Wait for Vertical Refresh, then select Enhanced Sync from the dropdown menu.
After you’ve done these, relaunch Minecraft to check if the stuttering persists.
If enabling Vsync didn’t do the trick, proceed to the next fix.
Fix 5: Turn off threaded optimization
Threaded optimization is a setting in NVIDIA Control Panel that controls the use of multithreaded optimization for all 3D games on systems with multi-core/HyperThreaded CPUs. Most new games perform better with threaded optimization enabled. However, some gamers reported that they fixed the stuttering issue in Minecraft by turning off threaded optimization. You can give it a shot. To do so:
- Right-click your desktop and select NVIDIA Control Panel from the menu.

- In the left panel, click Manage 3D settings, navigate to the Program Settings tab and select Minecraft Launcher.exe from the first dropdown menu.

- Scroll down to the bottom of the list and find the Threaded optimization, then click the dropdown menu next to it and change the value from Auto to Off. Click Apply to save changes.

After doing so, restart Minecraft and check if the problem is resolved.
If the stuttering issue remains, try the next fix.
Fix 6: Allocate more RAM
The RAM helps computers improve frame rates and frame pacing during gaming. In many cases, you need to allocate more RAM to games, especially for the games that use a lot of mods, like Minecraft. To do so:
- Open your Minecraft client and navigate to the Installations tab.
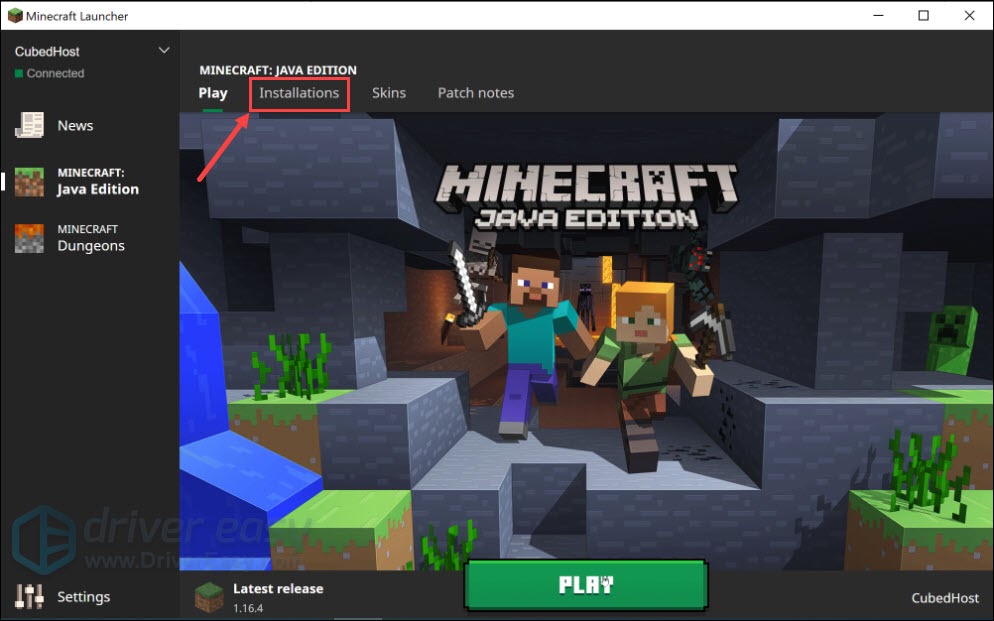
- Click the three dots button next to Minecraft, then select Edit from the dropdown menu.

- Click MORE OPTIONS.
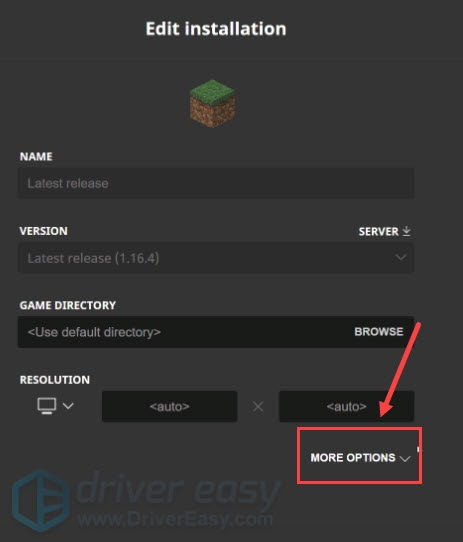
- Under the JVM ARGUMENTS section, there’s a line of text. Change the amount of RAM that Minecraft can utilize after Xmx (for example, Xmx4G means Minecraft is allowed to use 4GB RAM). Then click Save.
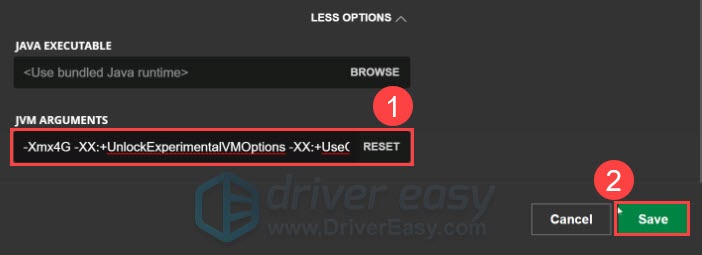
Launch Minecraft and see if this helps fix the stuttering.
If this solution doesn’t work, take a look at the next fix.
Fix 7: Uninstall OptiFine
OptiFine is a Minecraft optimization mod, which allows the game to run faster and look better. But it consumes some resources and may cause the stuttering issue. To see if that’s the case for you, you can try uninstalling OptiFine.
If the stuttering issue remains after uninstalling OptiFine, check out the last fix.
Fix 8: Reinstall Minecraft
If none of the methods above seemed to work for you, try reinstalling the game as a last resort. First, uninstall the current version of Minecraft from your computer, then reinstall the latest version of it. After that, relaunch the game to check if the stuttering issue is solved.
So that’s it. Hope this post helps you fix the stuttering issue in Minecraft. If you have any questions or suggestions, feel free to leave a comment below.


