Want to download new content at a reasonable speed at Battle.net but have no clue how? We’ve got you covered! Here are some tips for faster download rates:
- Close/ Suspend background downloads
- Avoid downloads during peak hours
- Deselect Limit download bandwidth option
- Change your download region
- Update your network adapter driver
- If your problem persists…
1. Close/ Suspend background downloads
There is no doubt that when you have simultaneous downloads, the download speed would be significantly decreased. So be sure to close or suspend other downloads when you’re downloading your game or updates.
It’s also worth mentioning that when tWindows automatic updates are enabled, it will automatically download and install the updates when they are available without your consent. During this process, your internet connection will be greatly affected. And your download speed will be throttled. To prevent this from happening, we suggest you disable Windows automatic updates:
1) On your keyboard, press the Windows + R keys to open the Run dialog box.
2) Type gpedit.msc and press Enter.
3) Navigate to the following policy: Computer Configuration > Administrative Templates > Windows Components > Windows Update.
4) On the right side, double-click Configure Automatic Updates.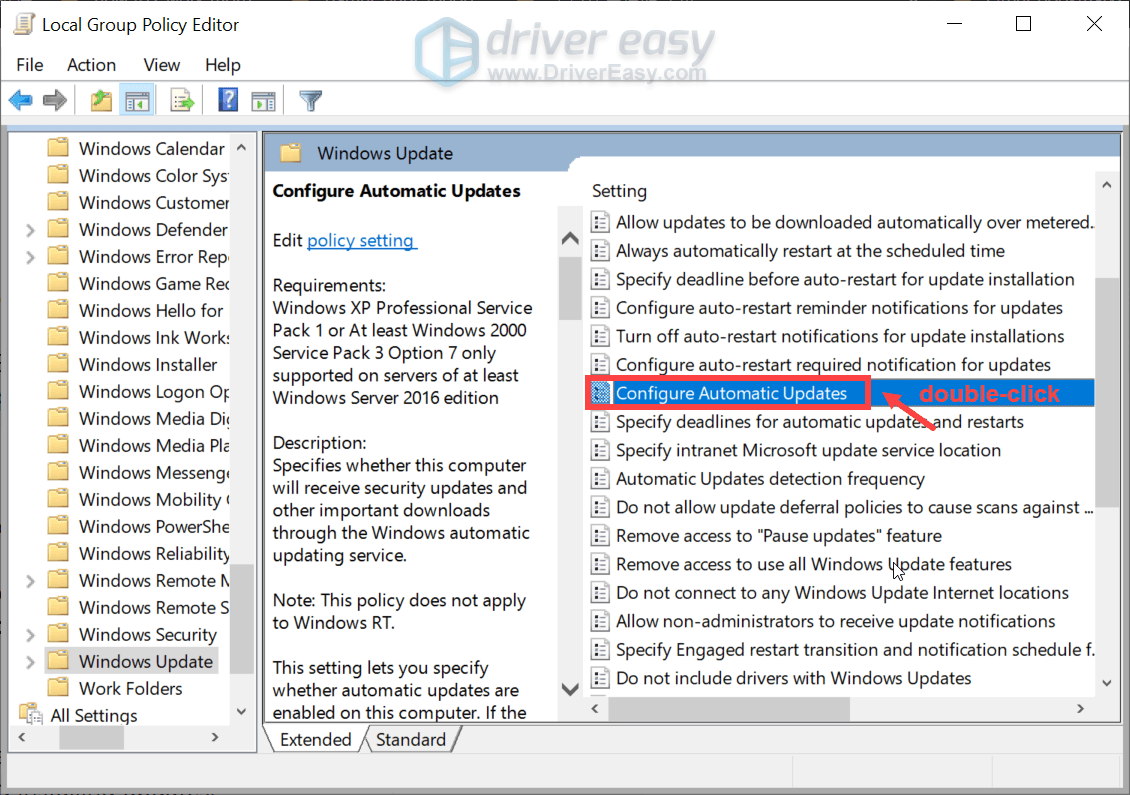
5) Select the Enabled option. Under Configure automatic updating, select the second option Notify for download and auto install. Then click Apply > OK.
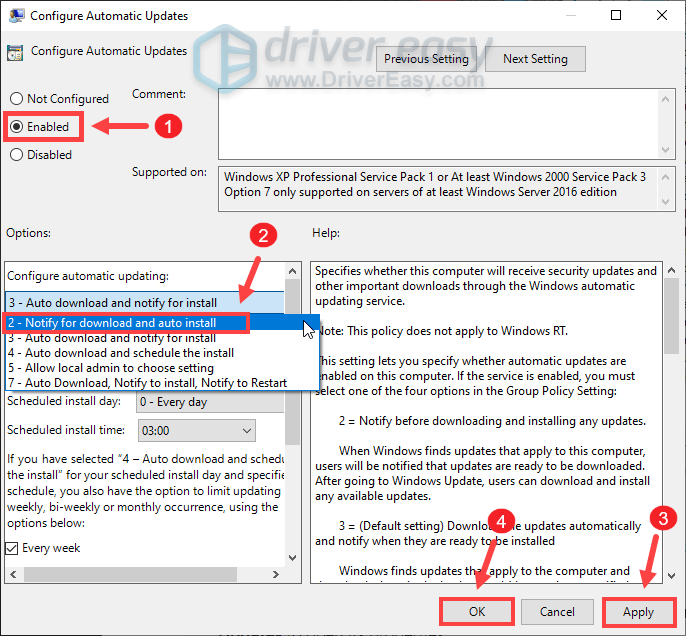
This will not turn off Windows Update but you’ll be notified when updates are available to download.
If you still can’t notice any difference on the download speed, move on to the next fix.
2. Avoid downloads during peak hours
According to reports, internet congestion typically happens from 9 AM to 11 PM, when lots of people in your area and your home are using the internet at the same time. And your internet connection can become sluggish. Therefore, we would suggest you avoid downloads during internet peak hours. Instead, you can let your game or updates download between 4 AM to 9 AM, when fewer people are online, so there is more bandwidth for individual users.
However, your PC would go to sleep after hours of inactivity. In this case, you can turn off sleep mode:
on Windows 10
1) In the Search box, type or paste power and sleep settings. Then click Power & sleep settings from the list of results.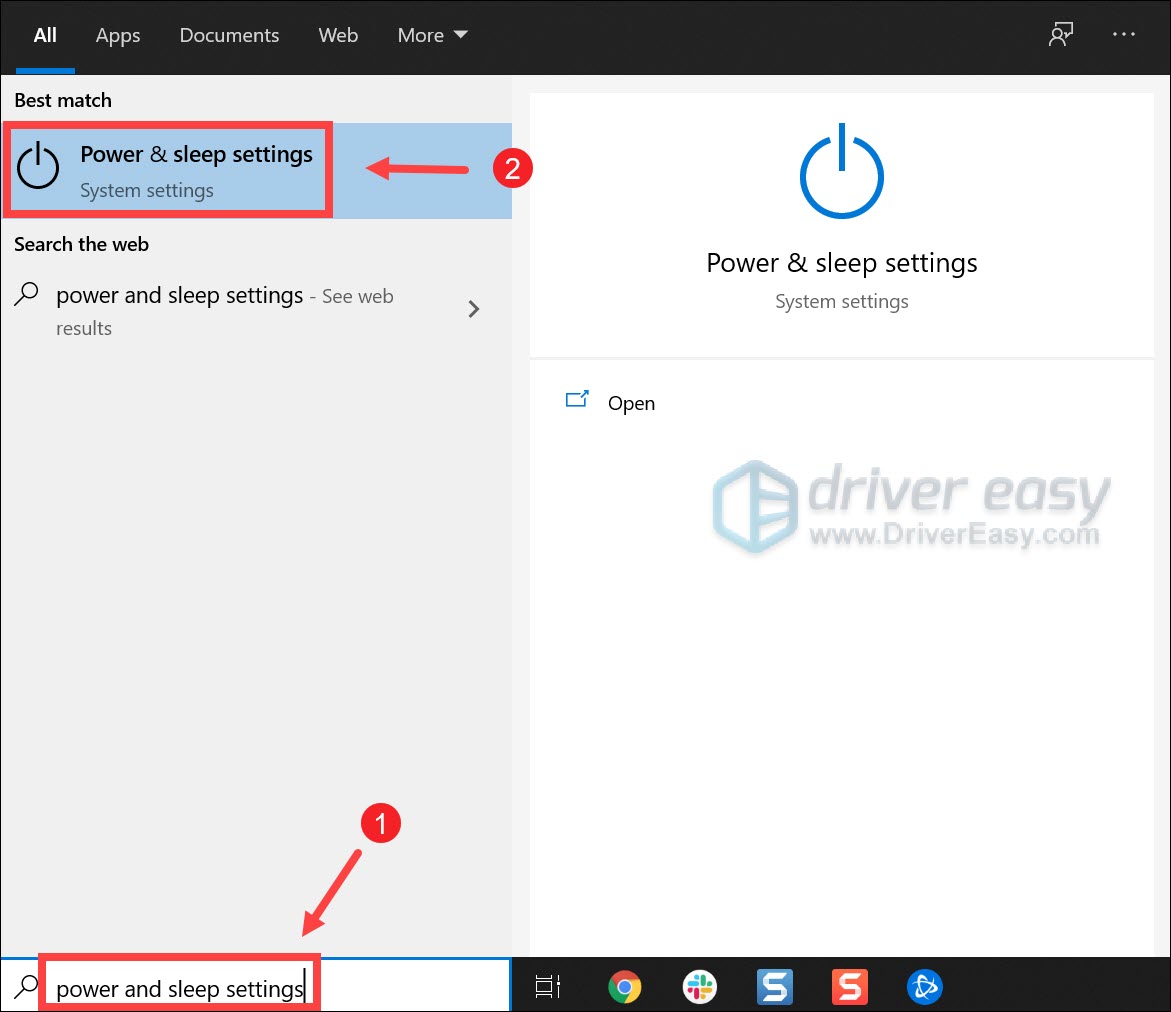
2) Scroll down to the Sleep section. Click on the down arrow and choose Never. 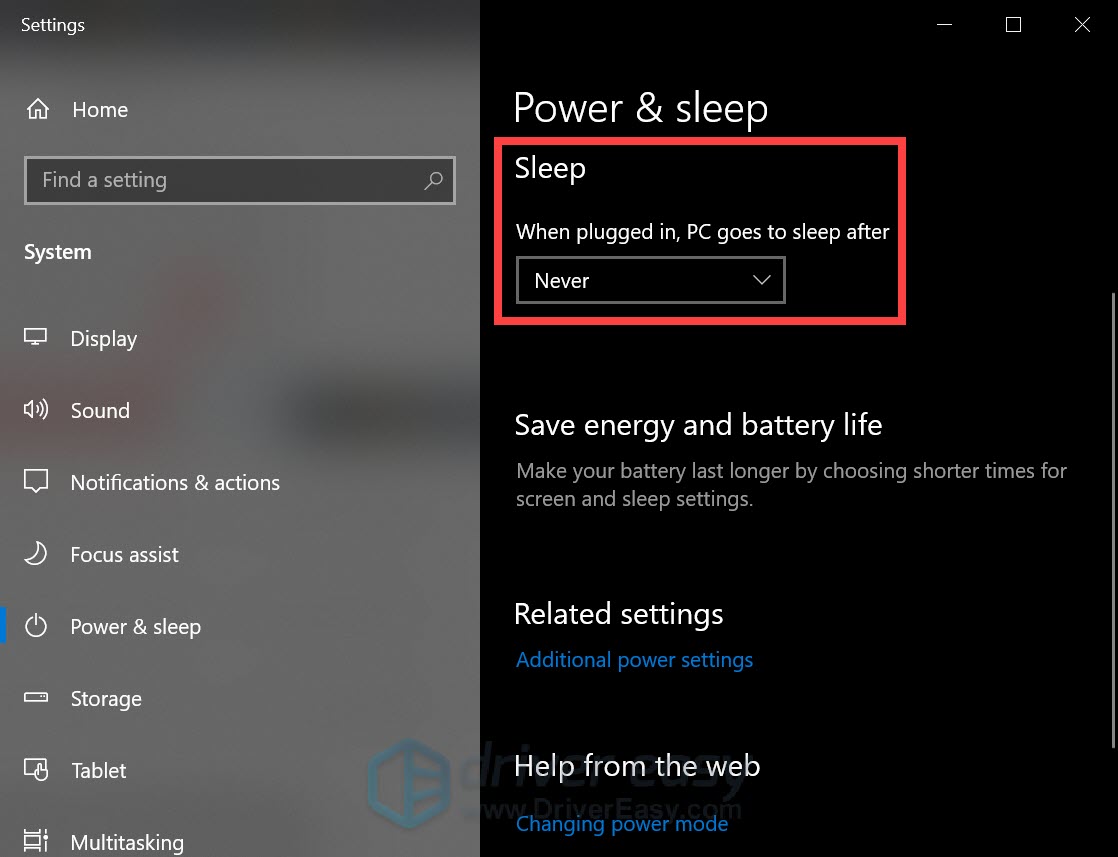
on Windows 11
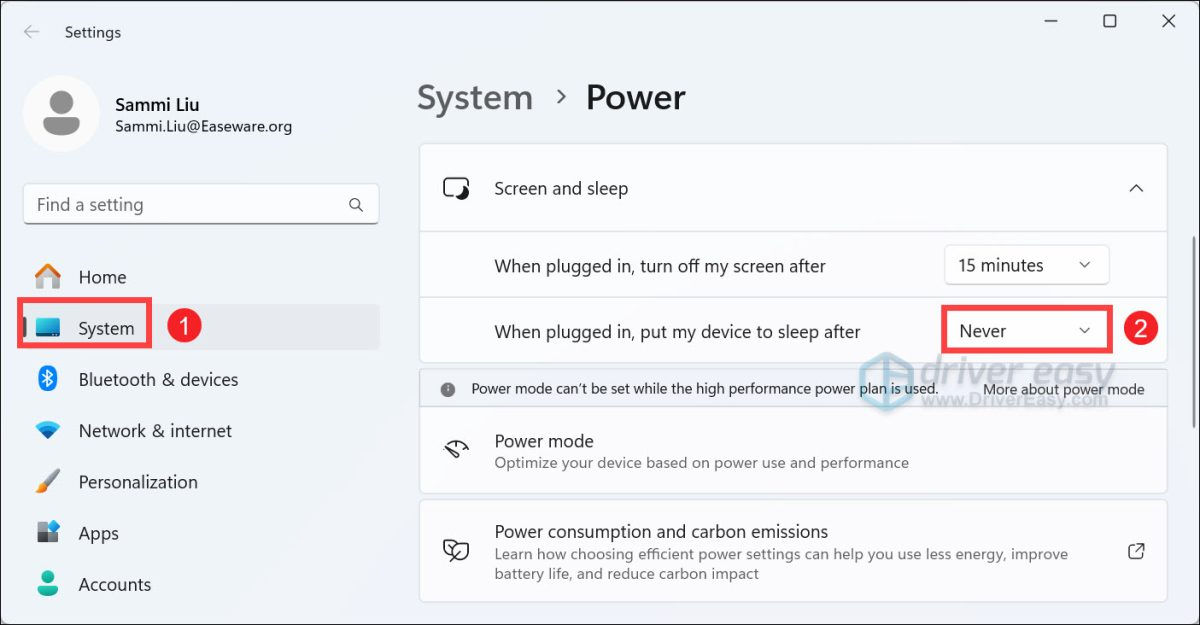
1) On your keyboard, press the Windows logo + I keys simultaneously to open Settings.
2) Select System from the left panel. Click on the down arrow icon next to Screen and sleep. Then make sure you select Never for When plugged in, put my device to sleep after.
Once you’ve applied the changes, you’re good to go.
However, if you wake up and find that the progress is stuck, don’t worry. There are a few other fixes for you to try.
3. Deselect Limit download bandwidth option
In case your download speed is capped, you can follow the instructions below to deselect the Limit download bandwidth option:
1) Open your Battle.net app. On the top-left corner, click on the down arrow and then select Settings. 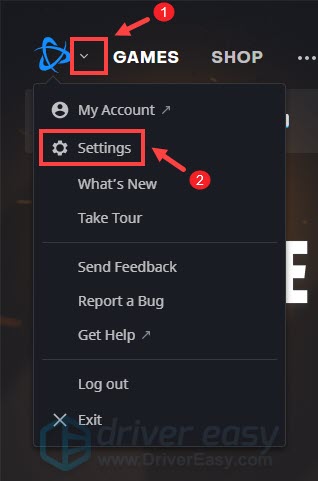
2) Select the Downloads tab. Scroll all the way down and you’ll see the Limit download bandwidth option. By default, it’s ticked. But here, you’ll need to untick it. Then click Done to confirm your changes. 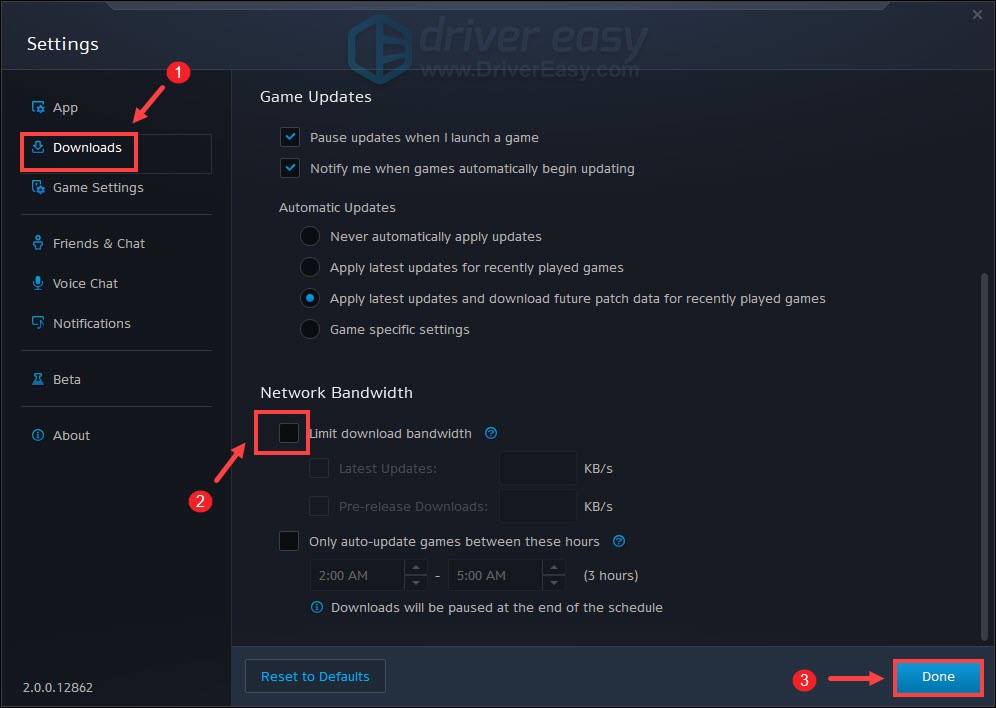
Resume your download and see if this helps boost your download speed.
4. Change your download region
Whenever there are updates available, lots of players would schedule their downloads at a similar time, making a certain server overloaded. To identify if that’s your case, you can choose a different region for all games or a specific game.
To change the region for all games:
1) Click on the down arrow next to your profile picture located in the upper-right corner. Then click Log out. 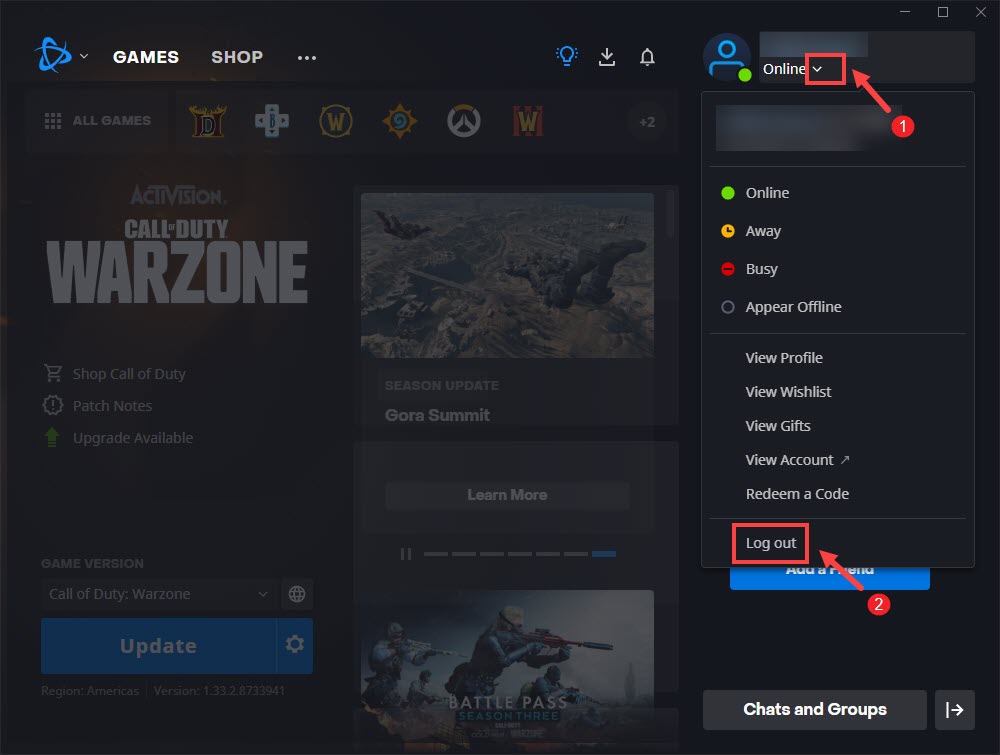
2) Upon login, click the globe icon and select a different server. ![]()
Then enter your account info and log in.
To change the region for a specific game:
1) Click on the globe icon next to the game you need to download and select a different server. 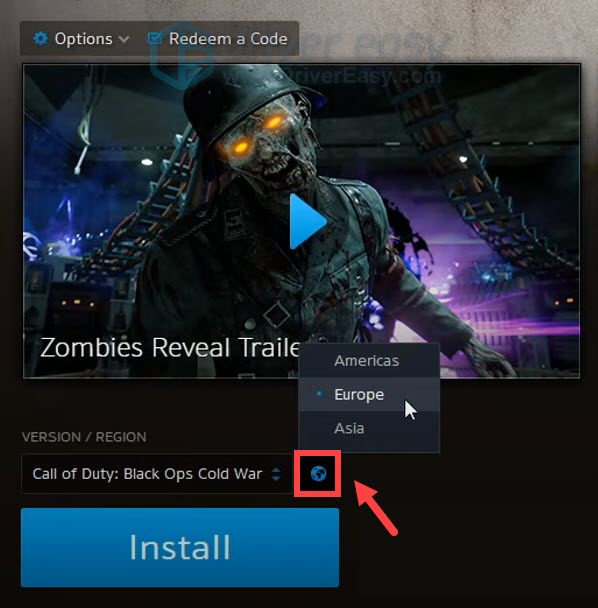
If this didn’t give you luck, try the next fix below.
5. Update your network adapter driver
A driver is an essential piece of software that lets your system communicate with your hardware. If it is outdated, it will cause noticeable performance issues. Therefore, if your internet connection is slower than supposed, it’s high time you check if your network adapter driver is up-to-date.
To update your device drivers, you can either do it manually via the Device Manager or head to the manufacturer’s driver download page to download and install the exact drivers for your system. Or you can do it automatically with Driver Easy, an automatic driver updater that will help you detect any outdated drivers, then download and install the latest drivers for your system.
Below is how you can update drivers with Driver Easy:
1) Download and install Driver Easy.
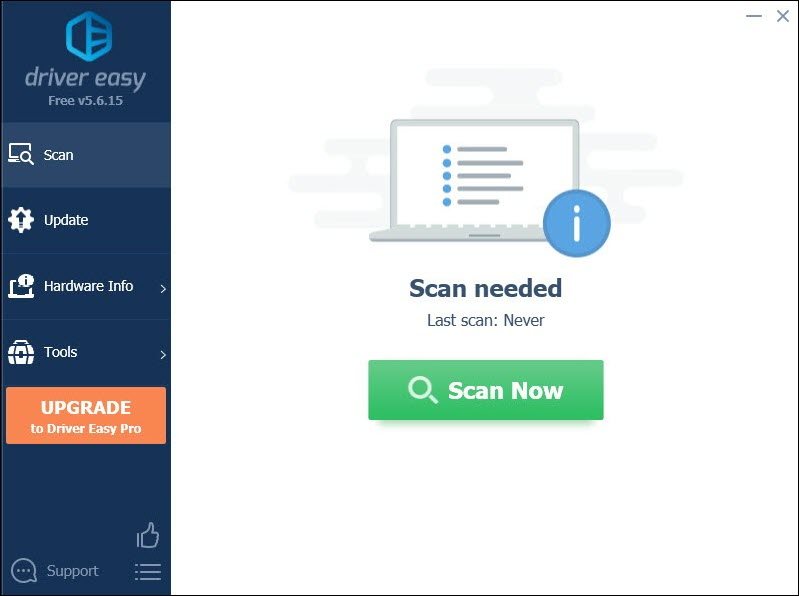
2) Run Driver Easy and click the Scan Now button. Driver Easy will then scan your computer and detect any devices with missing or outdated drivers.
3) Click Update All. Driver Easy will then download and update all your outdated and missing device drivers, giving you the latest version of each, direct from the device manufacturer.
This requires the Pro version which comes with full support and a 30-day money-back guarantee. You’ll be prompted to upgrade when you click Update All. If you don’t want to upgrade to the Pro version, you can also update your drivers with the FREE version. All you need to do is download them one at a time and manually install them.
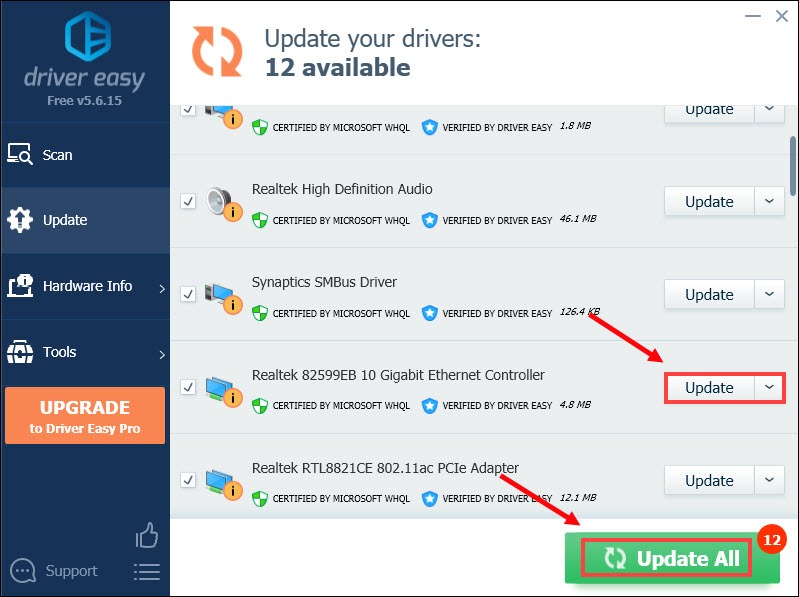
After updating your drivers, restart your PC. Then you can resume your download and you should be able to see a substantially faster download speed.
If that didn’t give you luck, proceed to the next fix.
6. If your problem persists…
If nothing else helped, give VPNs a try. By connecting to a different server, you’re able to avoid bandwidth throttling. But be advised: lots of problems may arise if you use a free VPN. Therefore, to secure your network, we suggest you use a paid VPN.
Here is the VPN we would like to recommend:
- Nord VPN (30-day money-back guarantee)
- Surfshark (7-day free trial)
- CyberGhost (free trial available)
That’s it. Feel free to drop a comment below to let us know if any fixes listed above worked for you. We also welcome alternate methods in case you’ve found one that worked for you.


